Giving Home Assistant a Face
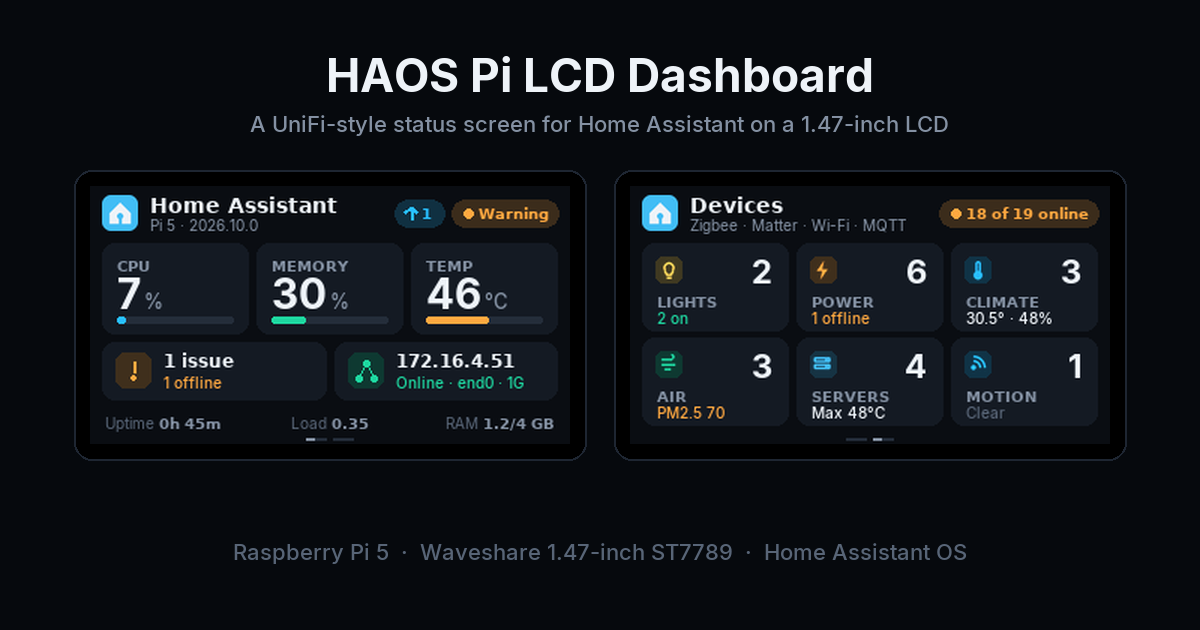
I recently moved my Home Assistant from a Raspberry Pi 3 to a Raspberry Pi 5. It sits in my 10-inch server rack, next to network gear that all has one thing that looks really cool: a small status screen on the front. UniFi devices do this really well, a dark screen, a logo, a few numbers and a colored dot that tells you if something needs attention.
The Pi had nothing, so the thought was simple, why not Home Assistant too? I wired a Waveshare 1.47-inch LCD to the GPIO header and built a small dashboard for it. It ended up as a Home Assistant app (add-on), so anyone can install it from a repository URL.
Requirements:
- Raspberry Pi 4 or 5 running Home Assistant OS (64-bit)
- Waveshare 1.47” LCD Module (ST7789V3, 172 × 320), the connecting cable comes with it
Hardware
I picked this size and the horizontal orientation for the rack. The plan is to give the Pi a 1U slot, and a 1U front is only 44.45 mm (1.75 inches) tall. The panel’s active area is roughly 17 × 32 mm, so lying flat it should fit easily, and it is still wide enough to show three numbers side by side. That’s why the whole dashboard is made for a 320 × 172 screen.
Wiring, the diagram is from the Waveshare wiki:
| LCD | Pin | GPIO |
|---|---|---|
| VCC | 1 | 3.3 V |
| GND | 6 | GND |
| DIN | 19 | GPIO 10 |
| CLK | 23 | GPIO 11 |
| CS | 24 | GPIO 8 |
| DC | 22 | GPIO 25 |
| RST | 13 | GPIO 27 |
| BL | 12 | GPIO 18 |
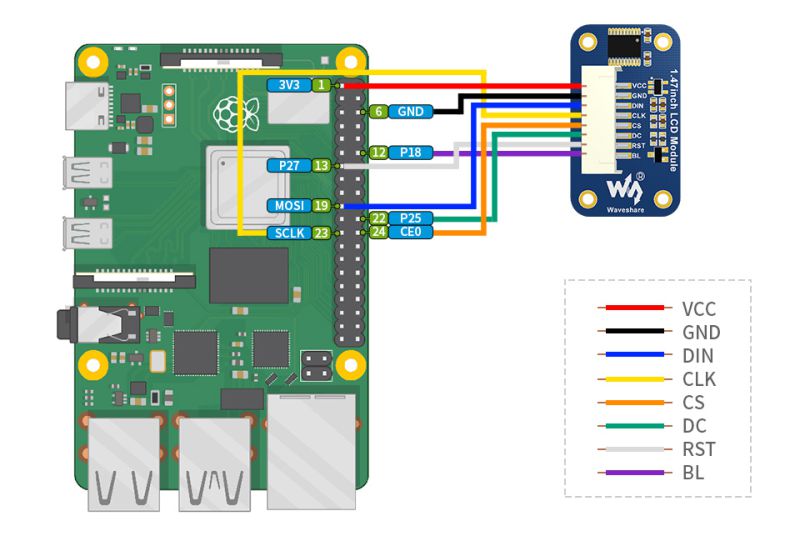
For the display init, it needs RGB565, MADCTL 0x70 for landscape, inversion on and a 34-pixel row offset. The offset is because the 172-pixel panel sits in the middle of the controller’s 240-row memory. If you get it wrong, you will see a band of noise along one edge.
Enable SPI on Home Assistant OS
This took me the longest. On Raspberry Pi OS you just run raspi-config, but Home Assistant OS has no option for it, not in the UI and not in the CLI. SPI is enabled by one line in config.txt, which sits on the boot partition:
1
dtparam=spi=on
The normal Terminal & SSH app can’t help here, it runs in its own container and doesn’t see /mnt/boot at all. So there are two ways, take the card out, or get root SSH on the host.
Option 1: Edit the card on a computer
Easiest one if your Pi boots from an SD card. Shut down from Settings > System > Power and put the card into your computer.
You won’t see any drive popping up. The boot partition is FAT, but HAOS marks it as an EFI System partition, and macOS and Windows don’t mount those by themselves. On macOS, mount it manually (without sudo it fails, even read-only):
1
2
diskutil list external        # find the disk with "EFI hassos-boot"
sudo diskutil mount disk2s1   # use your disk number
Edit /Volumes/hassos-boot/config.txt, then clean the hidden ._ files macOS creates and eject:
1
2
dot_clean -m /Volumes/hassos-boot
diskutil eject disk2
On Windows, diskpart can assign a drive letter (select disk N, select partition 1, assign letter=Z). Linux usually mounts it like any other partition.
Option 2: Host SSH on port 22222
Use this if the boot disk is hard to take out (like an NVMe SSD on a HAT), or if you want the early boot screen I explain later. HAOS has a debug SSH server on port 22222 which gives a root shell on the host. It stays off until you give it a key through a USB stick.
- Create a key:
ssh-keygen -t ed25519 -f ~/.ssh/haos_host - Format a USB stick as FAT32 with the label
CONFIG, and copy the public key on it asauthorized_keys(no extension). - Plug it into the Pi and run
ha os importin the Terminal & SSH app, or just reboot. Log in, enable SPI and reboot:
1
2
3
ssh -i ~/.ssh/haos_host -p 22222 root@homeassistant.local
vi /mnt/boot/config.txt      # dtparam=spi=on
ha host reboot
This key gives full root access to your Home Assistant host, keep it safe.
Once /dev/spidev0.0 shows up, everything else is done from the Home Assistant UI.
Things That Went Wrong
On HAOS you can’t install packages on the host, so everything runs as an app, basically a container the Supervisor builds and runs. Mine is Python with Pillow and libgpiod. Most of my time went into problems that didn’t throw any error:
- Fonts. The Alpine based image has no fonts, so Pillow quietly fell back to a tiny bitmap font and ignored every size I set. Installing
font-interfixed it. - Environment. The base image starts the script through s6, which clears the environment. So no
SUPERVISOR_TOKEN(API calls just failed) and noTZ(night mode would run in UTC). Fix is the shebang#!/usr/bin/with-contenv python3. - Versions. A local app only picks up
config.yamlchanges when the version number changes. I edited config for a while before noticing the Supervisor was still running the old one. - Bandwidth. A full frame is 110 KB, around 90 ms at 10 MHz SPI. Fine for a refresh every 5 seconds, but animations tear, so the progress bar only redraws the pixels that change.
Two Pages, Two Themes
The screen switches between System (20 s) and Devices (10 s). Two small bars at the bottom show which page you are on.
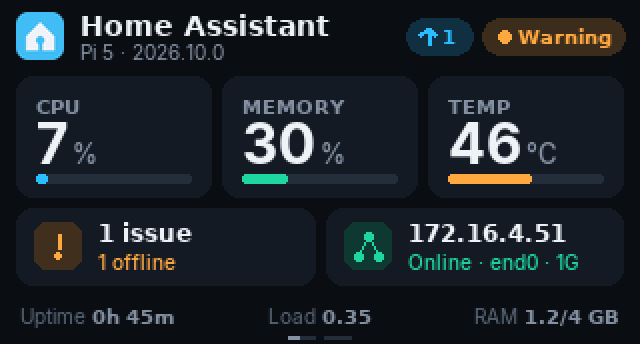 System page, Advanced theme
The System page shows CPU, memory, temperature, IP, uptime and load. The badge at the top is for the whole Home Assistant, it checks the same things HA uses to warn you: Repairs (Supervisor and OS issues show up here too), integrations that failed to load, and offline devices. Red for errors, orange for warnings, and the Health tile tells you what it is, like 2 issues · 1 repair · 1 offline. The cyan ↑ badge counts pending updates for Core, OS, apps, HACS and firmware.
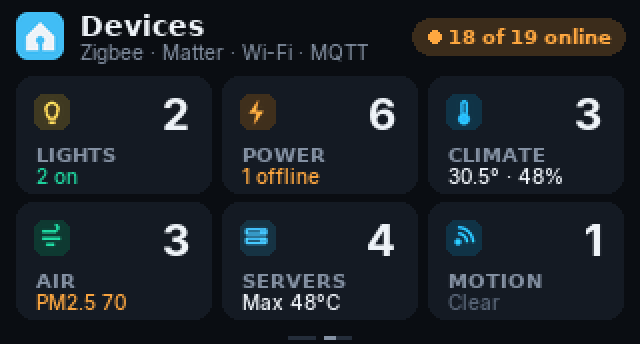 Devices page, Advanced theme
My device registry has 60 entries, but around 35 of them are not real devices (HACS cards, apps, Sun, Backup). The other 19 are on Zigbee, Matter, Wi-Fi and MQTT. I first made a Zigbee-only list, then dropped it, I wanted to see the whole house and not just one protocol. So the page groups every device based on its entities:
| Group | Which devices | Summary |
|---|---|---|
| Lights | light entity | how many are on |
| Power | switch, or power/energy sensor | total watts |
| Climate | only temperature and humidity | average °C and % |
| Air | PM2.5, CO₂, VOC or a fan | worst indoor PM2.5 |
| Servers | “server”/”rack” area, or MQTT | hottest temperature |
| Motion | motion, occupancy, door, window | Clear / Motion |
If a device lands in the wrong group, add a label like lcd-servers to move it, or lcd-hide to remove it.
There is also a Simple theme, no cards and bigger numbers, details only when something needs attention:
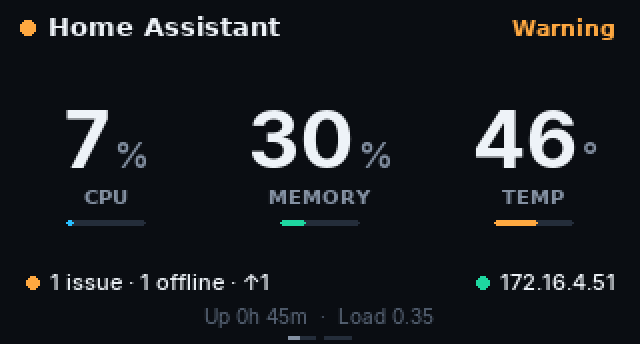 System page, Simple theme
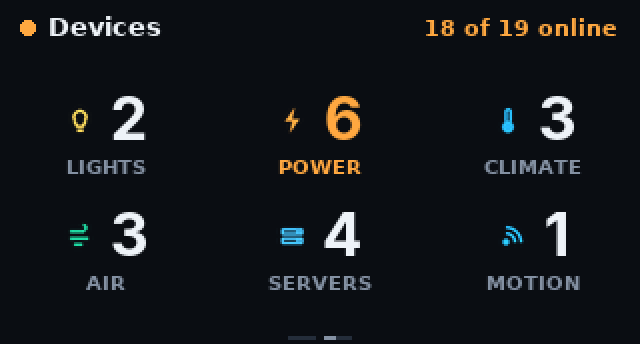 Devices page, Simple theme
Control from Home Assistant
At first, every change meant SSH. Now the app creates its own helpers on the first start, so the screen can be controlled like anything else in the house:
input_boolean.lcd_displayturns the screen on or off, from a dashboard or an automationinput_select.lcd_pageis Auto, System or Devicessensor.lcd_display_statusshowson,offornight
Theme, page timings, device groups, night hours, thresholds and GPIO pins are in the app’s Configuration tab. The app talks to Home Assistant through the Supervisor, so no access token is needed.
Boot Screen
This is my favourite part 😁. A UniFi device shows a logo and a progress bar as soon as it powers on, while a Home Assistant box shows nothing for a minute and a half.
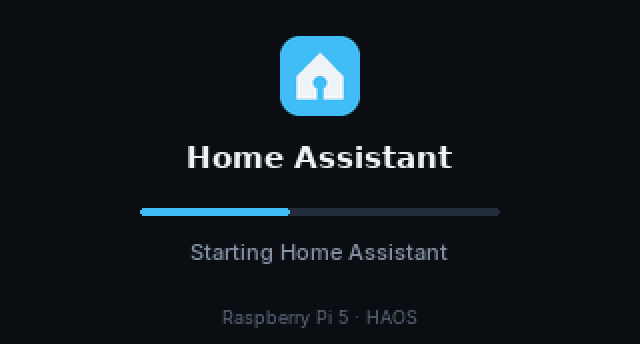 Boot screen while Home Assistant starts
I took help from an LLM for this part. I knew what I wanted, but not how to get the screen running before Home Assistant itself is up on a locked-down OS. Going back and forth with it gave me the udev and systemd idea, the GPIO handover and the shutdown hook below, and I tested every step on the Pi through a few reboots and a full power-off.
An app can’t draw anything until the Supervisor starts it, which is about a minute after power on, so the first minute has to come from the host. The root filesystem of HAOS is read-only, but /etc/udev/rules.d is on a persistent partition, and the host already has Python 3. Nothing to install here: the HAOS images for Pi 4 and Pi 5 ship it because the Raspberry Pi EEPROM updater (rpi-eeprom-config) is a Python script. So a udev rule starts a script as soon as the SPI device appears (wrapped here to make it readable):
1
2
3
4
5
6
ACTION=="add", SUBSYSTEM=="spidev", KERNEL=="spidev0.0",
  RUN+="/usr/bin/systemd-run --no-block --unit=lcd-boot
        -p RequiresMountsFor=/mnt/data -p Before=docker.service
        -p RemainAfterExit=yes
        '-pExecStop=/usr/bin/python3 /mnt/data/lcd_boot/lcd_boot.py stop'
        /usr/bin/python3 /mnt/data/lcd_boot/lcd_boot.py boot"
The script only uses the Python standard library (GPIO and SPI via ioctl) and draws the boot images the app already prepared as raw RGB565. When the app starts, the script hands over the GPIO lines and the app continues the same progress bar without resetting the panel, so there is no flicker.
On shutdown, Before=docker.service makes systemd stop the unit after all containers, and it shows Restarting… or Powered off · Safe to unplug. The Pi 5 keeps 3.3 V on after halt, so the last message stays on the screen.
| Time after power-on | Screen |
|---|---|
| 5 s | Host script: boot screen and progress bar |
| 58 s | App takes over: Starting Home Assistant |
| 95 s | Dashboard |
| Shutdown | Shutting down…, then Restarting… or Powered off |
This part is optional and needs Option 2. Without it, the boot screen starts when the app starts.
Install
- Wire the display and enable SPI.
- Go to Settings > Apps > App store > ⋮ > Repositories and add
https://github.com/zen29d/haos-pi-lcd-dashboard. - Install HAOS Pi LCD Dashboard and start it. The first install builds on the Pi, so give it a few minutes.
All options, grouping rules and the boot script are documented in the repository. Other ST7789 sizes will need a different offset and resolution in the code.
Wrap Up
The display part was easy, the hard part was deciding what not to show. My first layout had a graph, a Zigbee tile and lots of small text, and it looked worse than the simpler one. On a screen this small, less is better.
If you build one, do share it, would love to see it 🙂